
fabrics
& sewing
basic
medieval
clothing
sewing
tutorials
eyelet
tutorial
buttonhole
tutorial
cloth
button
tutorial
lucet
cord
tutorial
tassel
tutorial

|

Sewing
Tutorial:
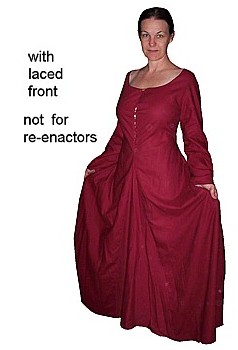
Easy Basic Gowne with 4 panels & 3 gores
Suits 13th and early 14th century
Re-enactors use a slightly
more complicated pattern with underarm gores and a seperate sleeve,
but to make a slightly cheaty one which requires less sewing,
you can cut the whole sleeve in one piece. Made out of wool or
linen, it's great for daywear or made from silk or velvet, it's
gorgeous for feasts!
Because it has lacing at the front, you can tailor this gown right
in so it is shaped and fitted through the torso. It's also very
pretty with a low-cut neckline. Go on, you know you want to!
 |
Step 1
You need: your fabric, pins, scissors, a cotton shirt for
sizing, and a Helpful Friend for the fitting at the end.
Don't use a stretchy shirt for patterning as it can give
a false sense of how it will fit you.
If you don't have a cotton shirt, get thee to an Op Shop
and spend $3 and get one.
|
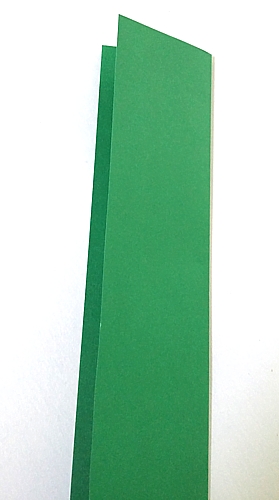 |
Step 2
Fold your fabric in half lengthways.The good side of the
fabric is on the inside.
This tutorial is NOT
SUITABLE for a single way pattern.
|
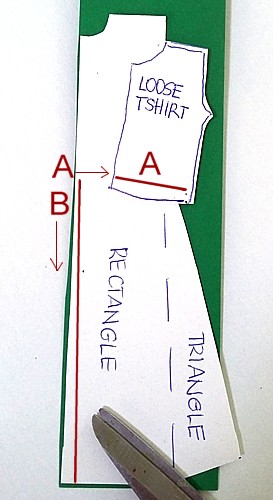 |
Step 3
How to know what size to make your pattern:
Mark on your shirt
where your waist is. I cut mine.
You can see it marked A.
Measure your waist
to the floor and add a little for hemming. That is your
B. I like to add an extra 5cm because I like mine long at
the front.
You can draw a rectangle
if you are being more historically accurate OR draw your
line from the waist out as far as the fabric lets you to
give you a built in triangle gore.
You will need 2 of
these. You can make one of them longer at the back if you
want a train.
|
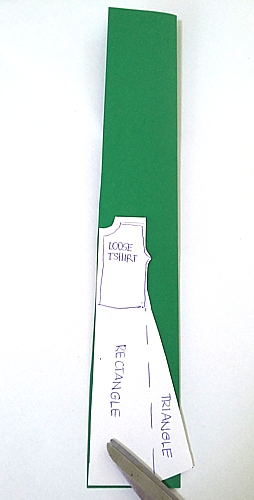 |
Step 4
Laying it on the fabric.
So now you have your
fabric all stretched out. The open side is on the left.
The fold is on the right.
Put your pattern at
the bottom of your folded fabric. My coloured paper wasn't
wide enough, so I went to the edge of the paper instead.
This happens a lot with cutting out real patterns. Don't
panic. Use what you have.
Okay.
Let's mark that dress out!
|
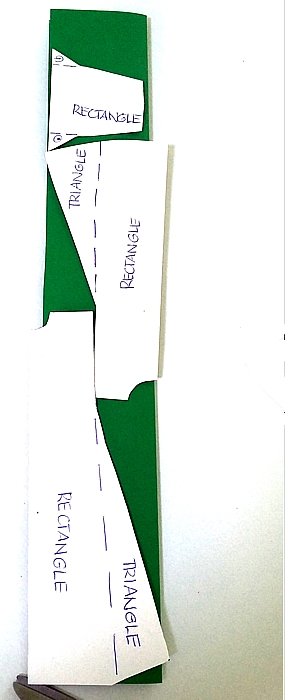 |
Step 5
Marking out your pattern.
You started at the bottom of the fabric.
One goes at the bottom.
The second one slots neatly next to the other one, only
upside down. The two body pieces should fit next to each
other.
Your sleeve is a rectangle
the length of your shoulder to wrist with little triangles.
They are cut seperately but can be cut in one piece for
beginners. Sleeve goes at the top.
You will notice that you also have enough fabric to cut
two triangles called "gores." One gore goes all
the way to the edge and goes on the fold. The other one
doesn't go on a fold.
Just double check again
that the fabric is folded the right way before you cut anything.
The good side of the fabric goes to the inside.
|
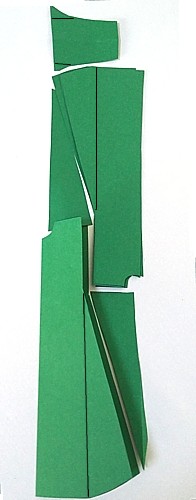 |
Step 6
Get snipping!!..
snip snip!
Cut your new dress
out.
Always, ALWAYS cut the seams a bit bigger than you think
you need. You can always take a dress in but it's really
hard to add pieces in once it's cut.
Now it's cut,
it will look like this.
Some of your triangle gores are upside down, so you will
need to swing them around so they are pointy side up.
Keep the top gores with
the front and the bottom gore with the back. You will see
why soon. |
 |
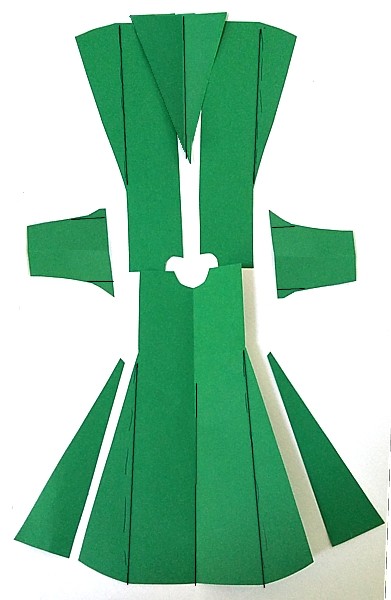
Step 7
Unpin the sides now that your dress is cut.
Unfold your dress altogether. it will look like this (or
the bottom gore will be in one piece and the top one will
be in two.)
You have a front, back,
two sleeves and three gores. The two skinny gores go at
the sides.
The big gore can go
in the back for fullness
OR
cut it in half and
put one in the back and cut a slit for a front one. Beginners,
I'd recommend skipping the front gore at this time.
|
 |
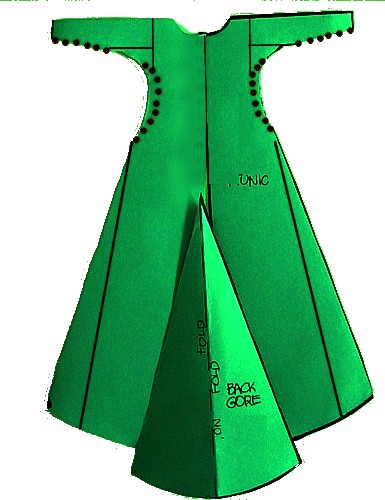
Step 8
This is how it will go together.
Swing half your dress
around so the shoulders and sleeves are touching and check
that the triangle gores are still in the right place.
It should look like this!
The front of your dress has the two small gores- one on
each side seam.
The back of your dress has the one gore which was cut on
the fold, and it will sit in the centre of the back seam.
Make sure your triangle gores are sitting evenly. They will
not be the same length on each side, so a bit of fiddling
is required.
One way to do this
is measure the shortest side from the top to the bottom,
then measure the same distance down the other side and cut
straight across the bottom.
|
 |
Step 9
Sewing in this order:
1. Gore number 1 to
side of dress.
2. Gore number 2 to
side of dress.
3. Back gore.
4. Shoulder to sew
front and back together.
5. Back seam.
6. Sleeve to shoulder.
Pin it on first to the shoulder seam at the centre of the
sleeve to make sure it's even.
7. Sleeve to shoulder.
8. Coffee break...
9. Side seam starting
at sleeve. It may not line up at hem properly and it's easier
to adjust hems.
10. Same thing other
side.
|
 |
Step 10
TA DA!
For a reasonably historically
accurate T tunic, you are done. To make it more accurate,
you would have cut the underarm gores and the side gores
separately at the start.
If you are making
a non accurate feasting gown, and want something pretty
and fitted, read on.
|
|
If you are making
a non accurate feasting gown, and want something pretty
and fitted, you can put a split down the front and use eyelets
to lace it up.
Step 13
Shaping your gown! Start with the sleeves, which are probably
too wide. Pin them in to make your sleeve as skinny as you
can. Test to make sure you can get you hand in and out.
Make adjustments now. Excellent.
Now, the side seams.
This is where all the shaping happens in this dress. Start
at your underarm. Check you can move your arm without tearing
your dress. Pin, pin, pin those side seams in as much as
you can all the way down along the red dotted line down
the body. Mark out where you want your neckline to go and
allow 2cm for the rolled edge. Once you're happy with the
fit and it's even both sides, unpin the front seam. Sew
up your sleeve and side seams. DO NOT cut any excess fabric
off at this stage. Seriously.
Turn your dress the
right way out and try it on again. Check you can wriggle
in and out. Once you are 100% happy with the fit, snip off
the excess fabric. Trim your hem as long as you want it.
Step 14
Lacing the dress. Put two re-inforcing strips down the front
of the dress on th einside- once each side and then sew
your eyelets in pairs no more than 2-2.5cm apart. If you
make them too far apart, the dress will gape. I really,
really recommend you don't just get a punch and punch eyelets.
It's a whole lot sturdier to sew them yourself.
Think it's too hard or don't know how?
Check the EYELET
TUTORIAL which shows you how easy it is to do.
 Don't
have the time or inclination to hand sew eyelets? If you
aren't a re-enactor and simply must use metal eyelets,
make sure you use an awl to make the hole in the fabric
and not punch a hole right through. Cutting the fabric will
mean your eyelets will not be strong and will tear with
very little use. Don't
have the time or inclination to hand sew eyelets? If you
aren't a re-enactor and simply must use metal eyelets,
make sure you use an awl to make the hole in the fabric
and not punch a hole right through. Cutting the fabric will
mean your eyelets will not be strong and will tear with
very little use.
Not sure what I mean, it's explained in detail in the eyelet
tutorial.
The
finished result.
Obviously, this can be made in one solid colour, but I wanted
to show how an easy pattern can give you a pretty gown when
made with heraldry.
It dresses up the gown quite a bit, especially for the novice
or beginner sewer who isn't ready to tackle the harder projects.
And now you're done!
Happy sewing.
|

Copyright
© Rosalie Gilbert
All text & photographs within this site are the property of
Rosalie Gilbert unless stated.
Art & artifact images remain the property of the owner.
Images and text may not be copied and used without permission.
|