|

fabrics
& sewing
basic
medieval
clothing
sewing
tutorials
eyelet
tutorial
buttonhole
tutorial
cloth
button
tutorial
lucet
cord
tutorial
tassel
tutorial

|

Sewing
Tutorial:
Easy Cheaty Basic T-tunic: Chemise, Undertunic or Overtunic
Not historically accurate sleeves, but easy
to make and suitable for getting started,
or for stallholders who need a basic look or for fun feasts!

The basic T-tunic for an
early Norman medieval gown is possibly one of the easiest gowns
to make for the beginner sewer and it looks nice made in a nice
colour with embroidered bands at the neck and sleeves and worn
with a coloured belt and hood. It hangs like a sack in a very
unattractive manner until the belt is on, when it drapes much
nicer. If you pick a bright blue or green it is very lovely! It
also makes a very serviceable chemise or smock pattern for underwear
for most time periods.
Re-enactors use a slightly
more complicated pattern with underarm gores and a separate sleeve,
but to make a slightly cheaty one which uses less sewing
and fussing, you can cut the top of the dress and the sleeve all
in one piece. This has extra gores to give this a fuller skirt
and a bigger hem so it's more feminine. Using gores is a proper
medieval dress-making technique and pretty easy as well. There
are no zips or lacing in this gown. It pulls on over the head
giving a lot of upper body room-to-move for active people and
little ones! Made out of silk or cotton velveteen (for non-re-enactors)
and with a train, it's gorgeous for feasts!
You can make it without the gores for an even easier gown.
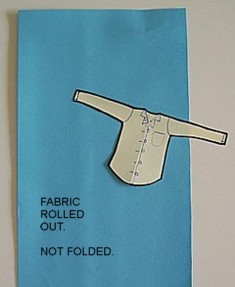 |
Step
1
You need: your fabric, pins, scissors and a cotton shirt for
sizing.
Don't use a stretchy shirt as it can give a false sense of
how it will fit you. If you don't have a cotton shirt, get
thee to an Op Shop and spend a couple of dollars and and get
one.
Lie your fabric flat on the floor unfolded.
|
 |
Step
2
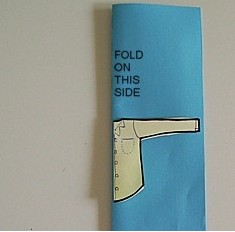
Fold your shirt and your fabric in half lengthways.
If you arm goes to the edge of the fabric like the picture,
HOORAY, you can make this with very little fabric at all.
If your fabric is skinny, you will need to fold your fabric
double (two runs of fabric instead of a folded over piece)
before you begin.
Your folded shirt matches the side with the folded fabric
on the left hand side. |
 |
Step
3
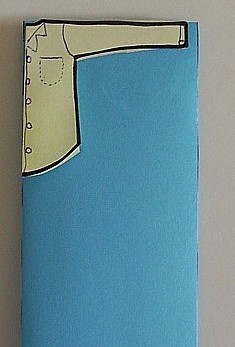
Fold your long, skinny folded fabric again the other way so
you have one fold where your shirt centre fold is and one
fold at the top of the sleeve.
You should have your one piece of fabric folded in four with
the neck in the top left hand corner. At the top of the arms,
there is folded fabric. At the centreline of the shirt, there
is folder fabric.
The loose edges of fabric are at the right and at the bottom.
Not sure what I mean?
Check the next picture to double check that you've folded
it right. |
 |
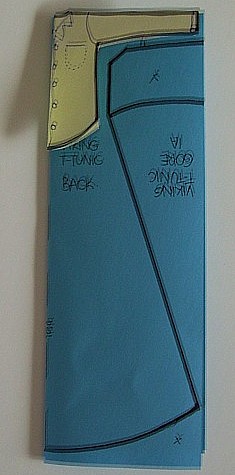
Step
4
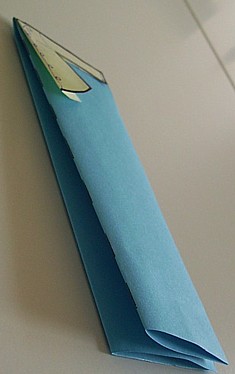
Looking at it from a different angle to double check you've
folded your fabric the right way before you cut anything.
Your loose corners are at the bottom right.
Your corner fold where everything meets is at the top left.
Your shirt is sitting right in that top left hand corner ready
to mark out your dress. |
 |
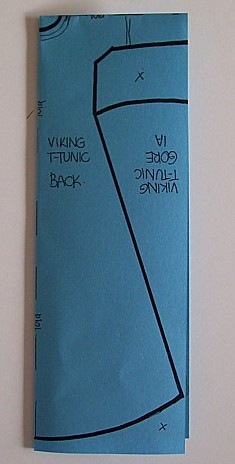
Step
5
(Sorry for the wonky picture.)
Marking out your pattern. This is not quite so terrifying
as it sounds.
Always ALWAYS cut the seams a bit bigger than you think you
need. You can always take a dress in but it's really hard
to add pieces in once it's cut.
Your pattern is based around your non-stretchy shirt. Because
it pulls on over the head, you need to allow extra room at
the sides.
The underarm curves up and the sleeve follows your shirt to
the wrist, tapering a bit as you go so the sleeves is close
at your wrist. Make sure you are marking a little wider than
you think you need to allow for seams. You can pin in again
to make it smaller if you'd like to!
Your sleeve seam is on the fabric edge and doesn't even need
hemming!
To get the size of your skirt, draw a line from the hip (the
bottom of the shirt) to the very edge of the fabric. The wider
your fabric, the more skirt you'll have.
Your centre seam is as long as you are to the ground. If you
want a train, allow more. You will notice that you have room
to cut an upside triangle called a gore. If you want to minimise
your sewing, you do not need to use the gore. |
 |
Step 6
Just double check again that the fabric is folded the right
way before you cut anything...
... it should look like this...
all the loose corners are in the lower right hand side?
Right!
Start pinning!
Remember, your gore
is OPTIONAL but will give fullness if you like a full skirt
on your gown.
|
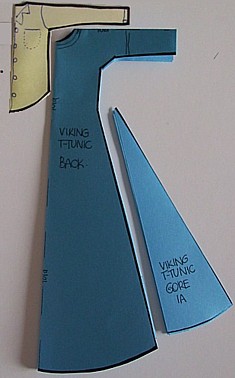 |
Step
7
Cut your new dress out.
Unpin the side now that your dress is cut.
IF YOU ARE USING THE GORE:
Swing the triangle gores around so it sits with the top of
the triangle gores at the waist and the bottom of the gore
at the hem of your dress like this.
Make sure you don't cut your head hole too large at this point.
Plenty of time to think about what kind of neckline you want
later.
You don't need to sew any centre seam as it's on a fold. |
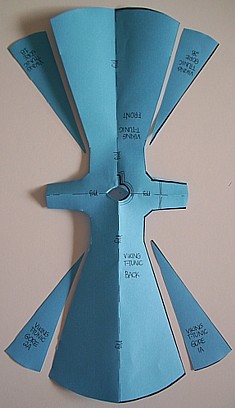 |
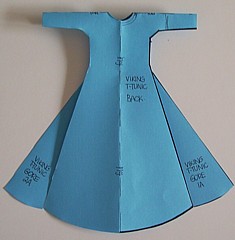
Step 8
Unfold your dress altogether. When it's spread out of the
floor, it looks like this.
IF YOU ARE NOT USING GORES:
You are ready to fold your gown and sew the side seams.
IF YOU ARE USING THE GORES:
Make sure your triangle gores are sitting evenly with the
raw cut side of fabric towards the raw cut side of the dress
body and all the selvedges on the outside of the dress.
Now get to work pinning those gores onto the body of the
dress. Make sure you pin the good sides together.
Depending on the size of the fabric you started with, the
gores may be a little big. That's ok. Start the top of the
gore at waist height. You will be able to trim the hem down
later. (Or it you want the hem to be as big as possible,
just trim the top of the triangle gore so it doesn't go
as high. This can be a bit fiddley for first-timers, so
you might want to not do that.)
At this point, it's
exactly the same front and back. Choose the side you want
to be the front and cut the neckline a little lower. Just
a little. Remember, you can take more off, but it's really
hard to put it back on. Okay so now you have a front.
The seam with the dotted line running horizontally through
the neckline is where you fold your dress now.
|
 |
Step 9
If you've folded correctly, you now have a dress which looks
like this. Fold your dress with the right side of the fabric
facing together.
Pin, pin, pin those
side seams all the way from the hem, along the body, under
the arms and down the sleeves.
Now very, very carefully check you can get it on over your
head. If it's very loose through the body, take the side
seams in a little. Try it on again. Still loose? Pin in
again and try it on. Remember, it will be a little loose
so you can pull it on over your head. Once you're happy
with the fit and you've adjusted your neckline, sew your
two side seams and you're finished!
|
|
|
Step
10
The finished product! Both of the photos on this page were
made WITHOUT THE GORES.
Your new gown will
hang like a sack a little at first, but don't be depressed.
When you put your belt on, it will pull in at the waist
like it does in medieval manuscripts and the picture at
the top.
Add a pretty hood and pouch and you're all dressed!
This pattern also makes a very good undergown for the 13th
century gown, the wide-sleeve gown and a nice chemise as
well.
Happy sewing!
|

Copyright
© Rosalie Gilbert
All text & photographs within this site are the property of
Rosalie Gilbert unless stated.
Art & artifact images remain the property of the owner.
Images and text may not be copied and used without permission.
|