|

fabrics
& sewing
basic
medieval
clothing
sewing
tutorials
eyelet
tutorial
buttonhole
tutorial
cloth
button
tutorial
lucet
cord
tutorial
tassel
tutorial

|

Sewing
Tutorial:
How To Make A Medieval Kirtle Or Gown
With 4 Panels, 3 Gores And A Bunch Of Buttonholes
Or Eyelets!
Re-enactor lady friends, this is the one you've been waiting for.
The seams for this kirtle are in the right place, it has a set
in sleeve and it has the sleeve seam in the right place at the
back of the arm. This is a slightly challenging pattern for those
who are starting out, but if you're keen, it's much easier than
a lot of those fantasy patterns you see. This is the pattern that
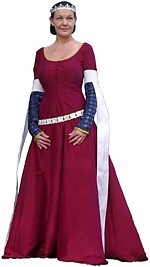
I use myself for a 4-panel late 14th century gown.
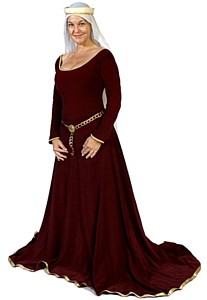
Made out of linen or wool
like the picture on the left, it's great for daywear or made from
silk or wool, it's stunning for formal wear. If you're not a serious
re-enactor, you can make it in cotton velveteen and it's gorgeous
for feasts! Because it has lacing at the front or at the back
(I'd suggest the back for beginners in case you have an unexpected
lacing crisis) or buttons down the front, you can tailor this
gown right in so it is shaped and fitted through the torso. It's
also very pretty with a low-cut neckline.
 |
Before
we begin!
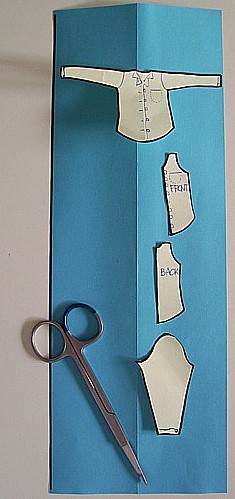
Where the seams go:
A lot of people starting out don't really know where the
seams go in a real medieval dress. If you're not a re-enactor,
odds are a lot of patterns you've looked at have panels
and seams all over the place.. a waist seam... darts...
Let's just have a look.
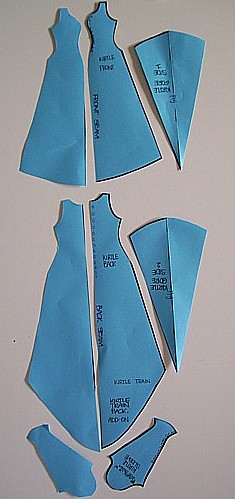
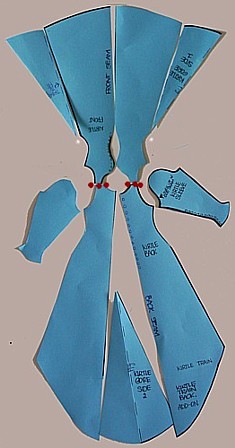
This is not the more complicated 8-panel dress. This one
has- four panels (2 at the front, 2 at the back) and some
triangle gores.
Looking at it front on, you will see the seams where the
white dots are.Thehardest thing about this dress is the
sleeves.
|
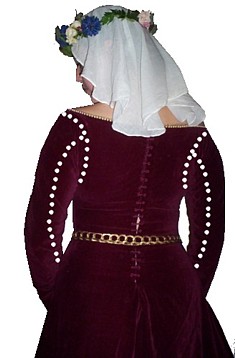 |
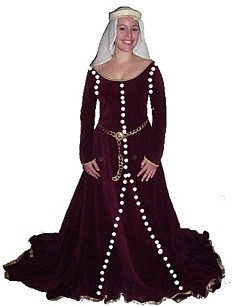
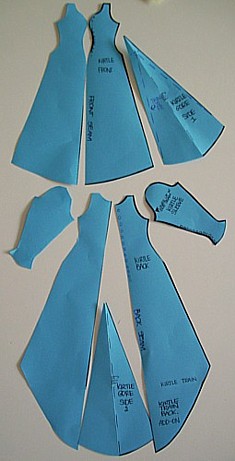
Turning
around- at the back, this is where your seams are.
You will notice that the seams on your sleeves aren't under
your arm like the Basic T-Tunic or Easy Early Gown.
They are sort of up the back. You will notice that a modern
woman's suit jacket has the seam in exactly the same
place.
If you are buttoning your gown, you can button almost all
the way up the sleeve seams for maximum bling!
You can, of course, just sew the seam up. |
 |
Step 1
Now we know what the dress should look like.
This tutorial is for a gown that buttons at the front. You
can adjust it to lace at the back if you want.
You need: your fabric, pins, scissors, a woman's suit jacket
which is a good fit (for sizing and patterning) and a Helpful
Friend for the fitting at the end. I use 6m of fabric but
I do like a train.
Don't use a stretchy shirt for patterning as it can give
a false sense of how it will fit you. If you don't have
a sacrificial jacket you are happy to pull apart, the Op
Shop is a good place to get a cheap one. It may be $10 but
it's still going to be cheaper than buying a pattern.
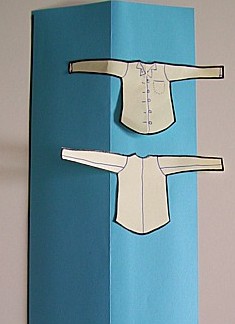
Why do you need a jacket? Check out the sleeve seams. They
are in the right place, exactly where the dotted lines were
on the dress.
|
 |
Step
2.
Pull your jacket apart.
Keep one front panel, one back panel and the matching sleeve.
If your jacket has extra seams down the front and back, leave
them sewn up. We just need to unpick front, back, side seams
and sleeves.
Make a note of whether you've kept the left or right sides,
so you remember which side sleeve you have.
The great thing about doing this, is that your sleeve will
definitely fit the armhole.
Fitting the sleeve is the worst bit of medieval dress making.
Trying to put the wrong sleeve on the wrong side will reduce
a grown woman to tears faster than anything. |
 |
Step 3
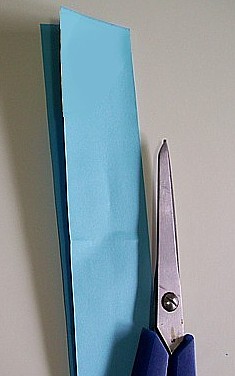
Fold your fabric in half lengthways.
The good side of the fabric is on the inside.
If your fabric is very skinny, you will need to fold your
fabric double (two runs of fabric instead of a folded over
piece) before you begin.
If you folded, the open side is on the left like the picture.
The fold is on the right.
|
 |
Step
4
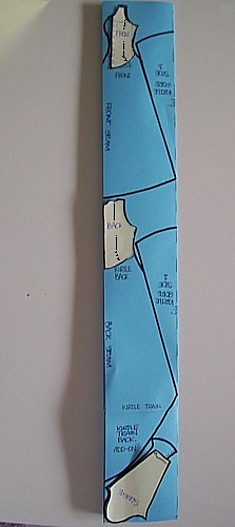
So now you have your fabric all stretched out, your jacket
pieces placed for marking out.
Okay. Let's mark that dress out! Start with the front of the
jacket which will be your front dress.
Add and extra curve outwards where your bust is.
You can use the armholes from your jacket.
The length of your gown is how tall you are plus a bit.
Once you've marked that, use the back piece of the jacket
and mark out the back panel and allow extra fabric for a train.
Mark two triangle gores using as much of the fabric at the
side that you can.
Place your jacket sleeve on the diagonal. Your sleeve MUST
be on the diagonal or it will not have enough give in the
fabric to bend your elbow much. At all. Allow for extra fabric
to go over your knuckles. You can always trim it back later
if it's too long.
If you have extra fabric, and you want to cut an extra gore
the same size as the top one, go for it! (not shown here).
You will have a fuller gown if you do. |
 |
Step 5
Remove your jacket pieces.
Just double check again that the fabric is folded the right
way before you cut or pin anything.
Now is the time to pin, pin, pin. Done? We're ready to cut
then.
Cutting out your pattern is not quite so terrifying as it
sounds. Always ALWAYS cut the seams a bit bigger than you
think you need. You can always take a dress in but it's
really hard to add pieces in once it's cut.
..okay..
snip snip!
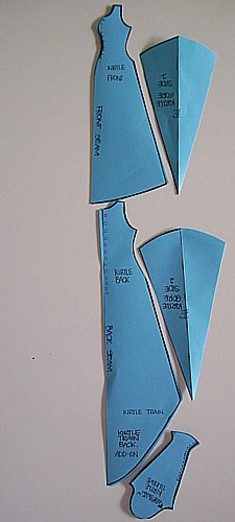
When you're finished, unfold your triangle gores.
It should look like
this.
Keep your leftover scraps if you are going to make matching
buttons for your gown.
|
 |
Step 6
When you've finished cutting and removed the scrap fabric,
unpin the gown.
Unfold the panels of your new dress out.
It will look like this.
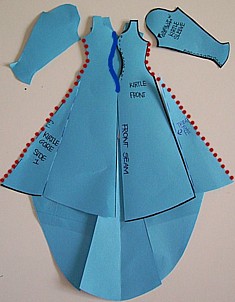
Your triangle gores are upside down at this stage..
|
 |
Step
7
Swing your triangle gores around so they are pointy side up,
and place them at the sides of the panels they belong to.
Front gores with front, back gore with back.
Keep the top gore with the front.
Place the bottom gore with the back panels so it sits in the
centre back seam with the top of the triangle gore at the
waist and the bottom of the gore at the hem of your dress.
Place your sleeves with the sides they belong to.
It's helpful to get a couple of post it notes and pin them
to the gown and sleeve with L and R on them so it's easy to
match up later. |
 |
Step
8
Now to sort out the top gores on the front panel.
If you had extra fabric and cut and extra top triangle gore,
it goes on the left hand side of the front panels.
If you didn't cut an extra gore, cut your top gore in half
and put one half onto the other side of the front panels as
shown by the red dots. |
 |
Step
9
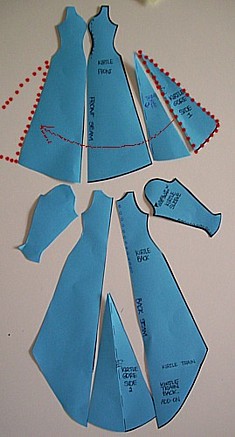
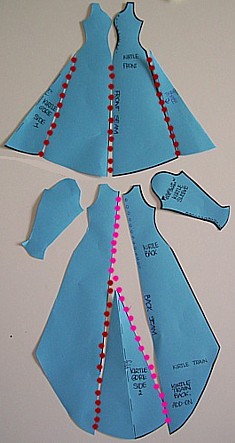
Now get to work pinning those gores onto the body of the dress.
Remember, the good sides face inwards.
Looking at the front panels, pin all the dotted lines. Do
both sides and the front one to the waist.
Depending on the size of the fabric you started with, the
gores may be a little big. That's ok. Start the top of the
gore at waist height. You will be able to trim the hem down
later. (Or it you want the hem to be as big as possible, just
trim the top of the triangle gore so it doesn't go as high.
This can be a bit fiddley for first-timers.
Next, pin the back triangle gore to the gown down the red
dotted line. Don't pin the back of the gown above the triangle
gore. Check you are pinning the good side of the fabric to
the good side of the fabric on the inside.
Now sew the bits you've pinned.
Once you've done that, pin the pink dotted line down the back
of the dress and along the back triangle gore.
Okay. Sew that up now. |
 |
Step
10
Now to attach the front of the glown to the back of the gown.
Swing your front around so the shoulders join the shoulders
of the back. (Your dress won't look like this... you've already
sewn the triangle gores and the back seams.)
Pin and sew the back of the gown to the front of the gown
across the red dotted line that goes horizontally.
Make sure your good sides are facing inwards.
Your sleeves are still not attached, but if you're having
trouble keeping track of which side is which, use a safety
pin to pin the right sleeve to the right side and ditto the
left.
Now you're ready to shape your gown! |
 |
Step 11
Put your gown on inside out so the seams are on the outside
ready to adjust. Get your Helpful Friend to pin the front
seam closed where the blue line is. Later you'll have buttons
or lacing at the front. Don't worry about how wide the rest
of your gown seems. You and your Helpful Friend are about
to really take those seams right in.
Start with the back seam. Take it in so that the gown shoulder
pieces are sitting on your shoulders. You can make the neckline
lower later, but you want the shoulders to sit right for
a start.
Next pin the gown down
the red lines at the sides. You will more than likely need
to take the side seams in a bit. Sometimes quite a bit.
Don't interfere with your armholes. They need to stay the
same so the sleeve fits it. Once you're happy with the fit
and it's even both sides, get your friend to unpin the front
seam and let you out. Sew up your adjusted seams.
DO NOT cut any excess fabric off at this stage. Seriously.
Turn your dress the right way out and try it on again. Check
you can wriggle in and out. Once you are 100% happy with
the fit, snip off the excess fabric. Trim your hem as long
as you want it.
|
 |
Step 12
Mark out where you want your neckline to go and allow 2cm
for the rolled edge.
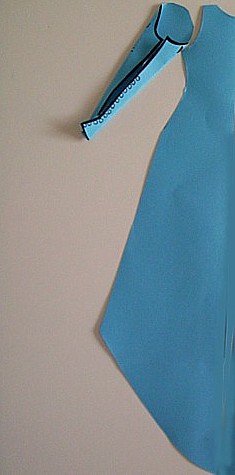
Now- the tricky bit- the sleeves!
Fold your sleeves and pin them so the seam is where it is
in the picture. Check your arm fits. Sew it up and pin it
to the dress like the picture.
Try it on.
If your sleeves seem really weird, it could be you have
the wrong sleeve on the wrong arm. This is the single biggest
disaster with making the dress- sleeves on the wrong side
or cut inside out. Fiddle with them until you're sure they're
on the right sides.
Happy with the fit? Great!
Now your dress is finished except for the buttons down the
front and buttons up the sleeves if you're making them.
If you're doing buttons all the way up the sleeves, you
won't sew them closed. You will sew a re-inforcing strip
like the one we are about to put on the front of the gown
for the buttonholes.
|
 |
Step
13
Hopefully you have left enough fabric to fold a little under
down the front where your buttonholes are going to go.
Put a re-inforcing strip in the front of the dress on the
inside. This is where the blue line was in the previous pic
that you didn't sew up. It will be a bit tricky around the
curvy bit of the bust, but you can do it if you fiddle a bit.
It's easier to make the re-inforcing curve of it's cut on
the bias. (Mine isn't)
The other side is where your buttons go, but always do all
your buttonholes first and then mark where the buttons go.
If you have slightly uneven buttonholes, your buttons will
line up perfectly and it will be far less noticable. Mark
your buttonholes no more than 2-2.5cm apart. If you make them
too far apart, the dress will gape.
Backstitch your buttonhole BEFORE you cut the fabric and then
sew buttonhole stitch (like a tiny blanket stitch) around
the hole. |
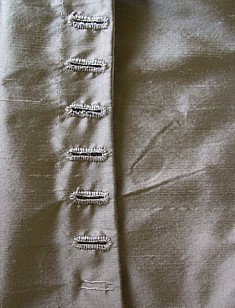 |
Step
14
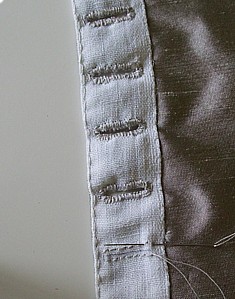
This is how the buttonholes sit on the front of the dress.
You can see a faint line of stitches where I sewed the re-enforcing
strip down. They go really, really close to the edge of the
opening.
The buttons you choose will be close to ball-shaped or domed
and on a shank. You will sew them right on the very edge of
your gown, not set in a cm like we do today.
You have the option of also doing buttonholes all the way
up your sleeves instead of sewing them closed, but I really
think you might like to not try this on your first dress.
And now you're done!
Happy sewing.
|
|
 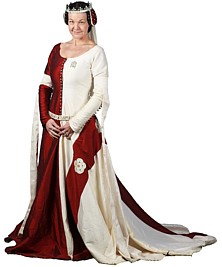 Variations. Variations.
You might like an heraldic gown with your coat of arms on
it, or a short sleeve gown which goes over the top of another
gown.
The kirtle with pin-on
sleeves is later 15th century and the kirtle has a waist,
so it's not right to use this pattern for that dress.
My advice for a first re-enactor gown is a wool in a nice
blue as it will dress up for a noble women with bling accessories,
but also be very servicable for working class wear with
different accessories.
|

Copyright
© Rosalie Gilbert
All text & photographs within this site are the property of
Rosalie Gilbert unless stated.
Art & artifact images remain the property of the owner.
Images and text may not be copied and used without permission.
|