|

fabrics
& sewing
basic
medieval
clothing
sewing
tutorials
eyelet
tutorial
buttonhole
tutorial
cloth
button
tutorial
lucet
cord
tutorial
tassel
tutorial
fichet
tutorial
fake
braid
tutorial
false
hairpiece
tutorial
cheaty
veil pin tutorial
medieval
chest
tutorial
medieval
stool or
pot stand
tutorial
how
to clean
a muddy hem
tutorial

|

Sewing
Tutorial:
How To Sew A Buttonhole
This is a very quick look
at how to do medieval buttonholes. There are a lot of in-depth
tutorials online, so I won't be duplicating them. This tutorial
is to share how to do the stitch and how to avoid the common pitfalls
of buttonholes for medieval gowns and sleeves.
Practice on a scrap piece of fabric first.
 |
Buttonhole stitch
This is a great picture taken from a vintage sewing pamplet
showing how to sew a buttonhole or blanket stitch. I've
added the dots and text.
Starting off is slightly tricky as the first stitch isn't
attached to anything, so do a few before you decide it's
not working. Start at the red dot on the underside of the
fabric. Pull through to the top so you have your thread
at the top. Next put your needle where the green dot is
but don't pull it all the way tight. Look at the needle
in the picture. You need to allow a tiny bit to loop over
the tip. Then pull it tighter. Do a few until you've got
the hang of it. Now we're ready to start!
|
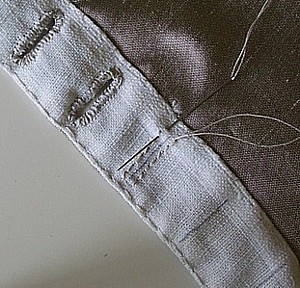 |
Medieval
buttonholes
Buttonholes are always horizontal and usually very closely
spaced. On the back of the fabric, there is often a re-inforcing
strip. You won't need this if your garment is lined. This
one is linen, but silk is good for wool also.
Sew your re-inforcing strip on. Your re-inforcing strip can
be cut on the diagonal if you are doing the front of a gown
which has curves but I usually use a stright non-bias for
sleeves.
Mark out your buttonholes. 2cm apart is ideal for gowns and
sleeves, but in some cases on sleeves, the buttons are smaller
and can be touching, so your buttonholes may be closer together. |
 |
I
sometimes like to backstitch a rectangle to stop the fabric
fraying. It's not correct, and I don't always do it, but if
you have issues with buttonholes which fall apart when you
cut them, this will help. It also makes the buttonhole extra
sturdy since they are very close to the edge.
Next, cut the buttonhole itself. Use something really sharp
to get a clean cut. The better the cut, the less fraying you
will have. Embroidery scissors are good because they have
a tiny nose to poke through the fabric where you start.
Do your buttonhole stitch all around the buttonhole. Put your
stitches fairly close together, especially at the edge of
the garment or sleeve where the most pressure will be. That's
it! The more you do, the neater they will get! |

Copyright
© Rosalie Gilbert
All text & photographs within this site are the property of
Rosalie Gilbert unless stated.
Art & artifact images remain the property of the owner.
Images and text may not be copied and used without permission.
|