|

fabrics
& sewing
basic
medieval
clothing
sewing
tutorials
eyelet
tutorial
buttonhole
tutorial
cloth
button
tutorial
lucet
cord
tutorial
tassel
tutorial

|

Sewing
tutorial:
Sideless surcote with side gores
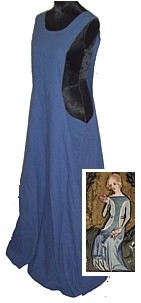
Re-enactors can also use this pattern. This is an overdress and
always has something with long, fitted sleeves underneath. Make
it from linen or wool for day wear. Made if from silk for fancy
formal events. If you're a noblewoman, it can be cut away quite
a bit to show off your fancy undergown.
 |
Step
1
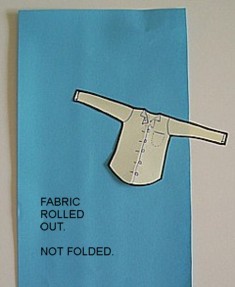
You need: your fabric, pins, scissors and a cotton shirt for
sizing.
Don't use a stretchy one as it can give a false sense of how
it will fit you.
If you don't have a cotton shirt, get thee to an Op Shop and
spend a couple of dollars and get one.
Lie your fabric flat on the floor unfolded. |
 |
Step
2
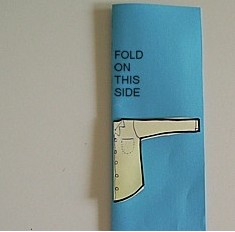
Fold your shirt and your fabric in half lengthways with the
fold on the left hand side. The good side of the fabric is
on the inside.
If you arm goes to the edge of the fabric, HOORAY, you can
make this with very little fabric at all. If your fabric is
skinny, you will need to fold your fabric double (two runs
of fabric instead of a folded over piece) before you begin.
Your folded shirt matches the side with the folded fabric.
Fabric fold check! Your fold is on the left side. Your loose
sides are on right. Your shirt is sitting right in that corner
at the top ready to mark out your surcote. |
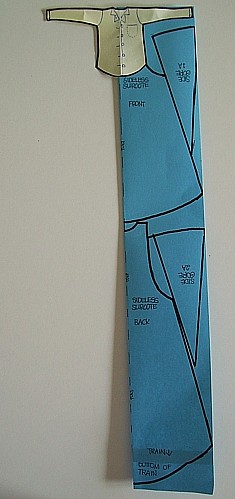 |
Step 3
Marking out your pattern. This is not quite so terrifying
as it sounds.
Always ALWAYS cut the seams a bit bigger than you think
you need. You can always take a dress in but it's really
hard to add pieces in once it's cut.
You mark your seam
from the edge of your shoulder straight down to your belly
button and then curve out to your hip where the dotted red
lines are and then out to the fabric edge for the skirt.
You will need to mark out 2 of them. You can cheat by cutting
out one and simply tracing around it to make the other one.
The bottom one will be longer at the bottom.
To get the size of your skirt, draw a line from the hip
(the bottom of the shirt) to the very edge of the fabric.
The wider your fabric, the more skirt you'll have.
Your centre seam is as long as you are to the ground. If
you want a train, allow more. You have room to also cut
some triangle gores.
Okay, start pinning!
|
 |
Step
4
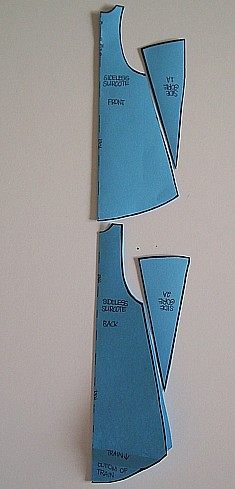
Just double check again that the fabric is folded the right
way before you cut anything..
.. . it should look like this...
Yes? Great!
Cut your new surcote out.
Unpin the sides now that your dress is cut.
It looks like this. |
 |
Step
5
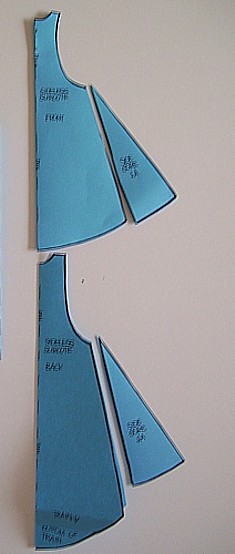
Swing your triange gores around so the top of the triangle
is at the waist and the bottom of the triangle lines up with
the hem.
You may need to trim your triangle to fit the sides, but that
okay.
Just trim all four of them together so they are the same size.
Check that you have front and back. |
 |
Step
6
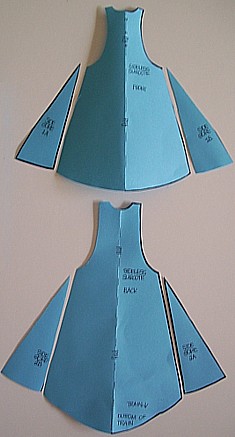
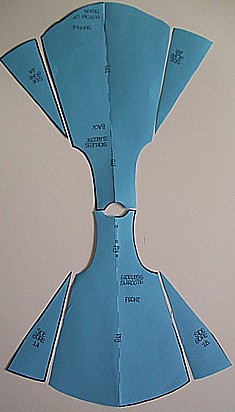
Unfold the surcote so you can clearly see your pieces.
It looks like this.
One piece is longer at the bottom. This is your back.
You have 4 little triangle gores which go at the sides.
Pin pin pin them onto the sides of your surcote pieces!
Remember, the GOOD side of the fabric faces the good side
of the fabric. You are pinning on the underside, so the seam
is inside when you're finished. |
 |
Step
7
Swing one piece around 180 degrees so the shoulder pieces
are touching.
Make sure your fabric is the same way out so you have the
two good sides together.
When it's spread out of the floor, it looks like this.
The side you want to be the front is the one without the train.
Cut the neckline a little lower. Just a little. Remember,
you can take more off, but it's really hard to put it back
on. Okay so now you have a front.
You will want to adjust the front of your surcote so it is
not as wide as the back. Do that at the very end so you are
allowing for hemming.
Pin the shoulders together, remember to check the good side
of the fabric is facing the good side of the fabric. You want
your sewing on the wrong side, so the good sides face inwards.
|
 |
Step
7
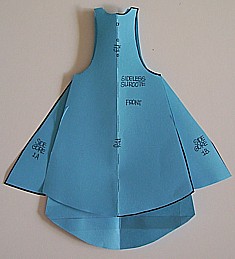
Okay, now fold your surcote so it looks like a surcote. It
looks like the pic. Turn it inside out and pin, pin, pin those
side seams all the way from the hem to the hip.
ALWAYS pin and try on before you sew. It beats the heck out
of unpicking later on.
Once you're happy with the fit and you've adjusted your neckline,
sew your two side seams and you're finished!
Now is the time to trim the front of the surcote a little
if you want a really cutaway garment. Remember, you need to
allow enough fabric to do a rolled hem around the side openings.
Hem the sides and hem and you're finished! |
|
|
The
finished product
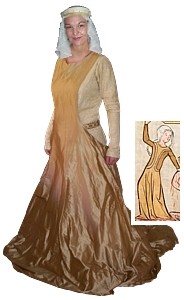
Shown here, I've made the surcote in gold silk for a friend.
The bottom hem can be made long like this or shorter to the
ground for day work, but usually those ones have higher armholes.
The top picture is the exact same pattern but made from linen
for day wear. It might be worn over linen or wool as an apron
to keep the undergown clean.
Happy sewing! |
Notes:
You can also line this surcote with a contrasting colour. All
you need to do is cut two of these together and then sew them
together. If you are doing this, just be aware that sewing the
armholes can be a bit perilous. Do them one at a time. Do the
neck seperately. Do the hem last of all and you must check after
each step. It's very easy to sew everything into a loop and not
be able to turn it right side out again.

Copyright
© Rosalie Gilbert
All text & photographs within this site are the property of
Rosalie Gilbert unless stated.
Art & artifact images remain the property of the owner.
Images and text may not be copied and used without permission.
|