|

fabrics
& sewing
basic
medieval
clothing
sewing
tutorials
eyelet
tutorial
buttonhole
tutorial
cloth
button
tutorial
lucet
cord
tutorial
tassel
tutorial

|

Sewing
Tutorial:
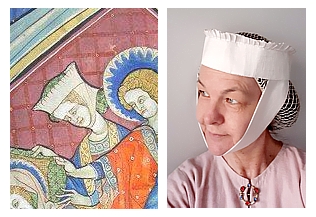
Early 14th Century Pleated Fillet for use with Barbette

under
construction
The fillet can be seen
in medieval art in the early 14th century, usually pre-1350s.
There are a number of variations, ranging from plain and unfrilled,
frilly and pleated-looking. Their exact manufacture is unclear
as there are no existing ones, so all we can do is make them with
techniques which are known from materials which were used. It
is always worn with a barbette and usually a hairnet.
This tutorial is only one potential method of making these
to look like the images we see, and it's the way I've done it
with the best results. I've made it without the canvas
stiffening and also just be sewing the ruffle to the linen band,
but this is the way I have made my very sturdy version. It's definitely
more work, but the result was very pleasing to me. This method
pleats the frill instead of ruffling it.

What
you need:
All you need is thread, a needle, pins, scissors,ruler, pen or
pencils, a long strip of linen the circumfrence of your head plus
about 1.5cm overlap, a strip of canvas or aida cloth the circumfrence
of your head plus 1cm. I made this one from silk.
| |
Step
1
You will need to decide how high you want your fillet to be.
Images in manuscripts vary, so gather your supplies.
If you're not sure, wide ruler can be a good guide. You'll
also need a ruler, pins, pencil, scissors and a tape measure
to measure your head with. |
| |
Step
2
Cut |
| |
Step
3
Do |
| |
Step
4
When |
| |
Step
5
Tighten |
| |
Step
6
Do |
| |
Step
7
Tighten |
| |
Step
8
As |
| |
Step
9
To |
| |
Step
10
Stitch |
| |
Step
11
You |
| |
Step 10
If
Happy sewing!
|

Copyright
© Rosalie Gilbert
All text & photographs within this site are the property of
Rosalie Gilbert unless stated.
Art & artifact images remain the property of the owner.
Images and text may not be copied and used without permission.
|